Networking
Network Policies
Network Policies in Kubernetes add the ability to allow and deny network traffic from specific pods and namespaces. Both egress traffic from a Pod and ingress traffic to a Pod can be controlled. In a vanilla Kubernetes cluster all traffic between all namespaces is allowed by default. This is not the case in XKS. Out of the box in XKS all tenant namespaces have a default deny rule added to them. This default deny rule will block any traffic going between namespaces. It will deny both ingress traffic from other namespaces and egress traffic to other namespaces. All traffic within the namespace between Pods is allowed. The reasoning behind this setup is that Pods should not have more network access than they require to function, as it reduces the blast radius in case of an exploit.
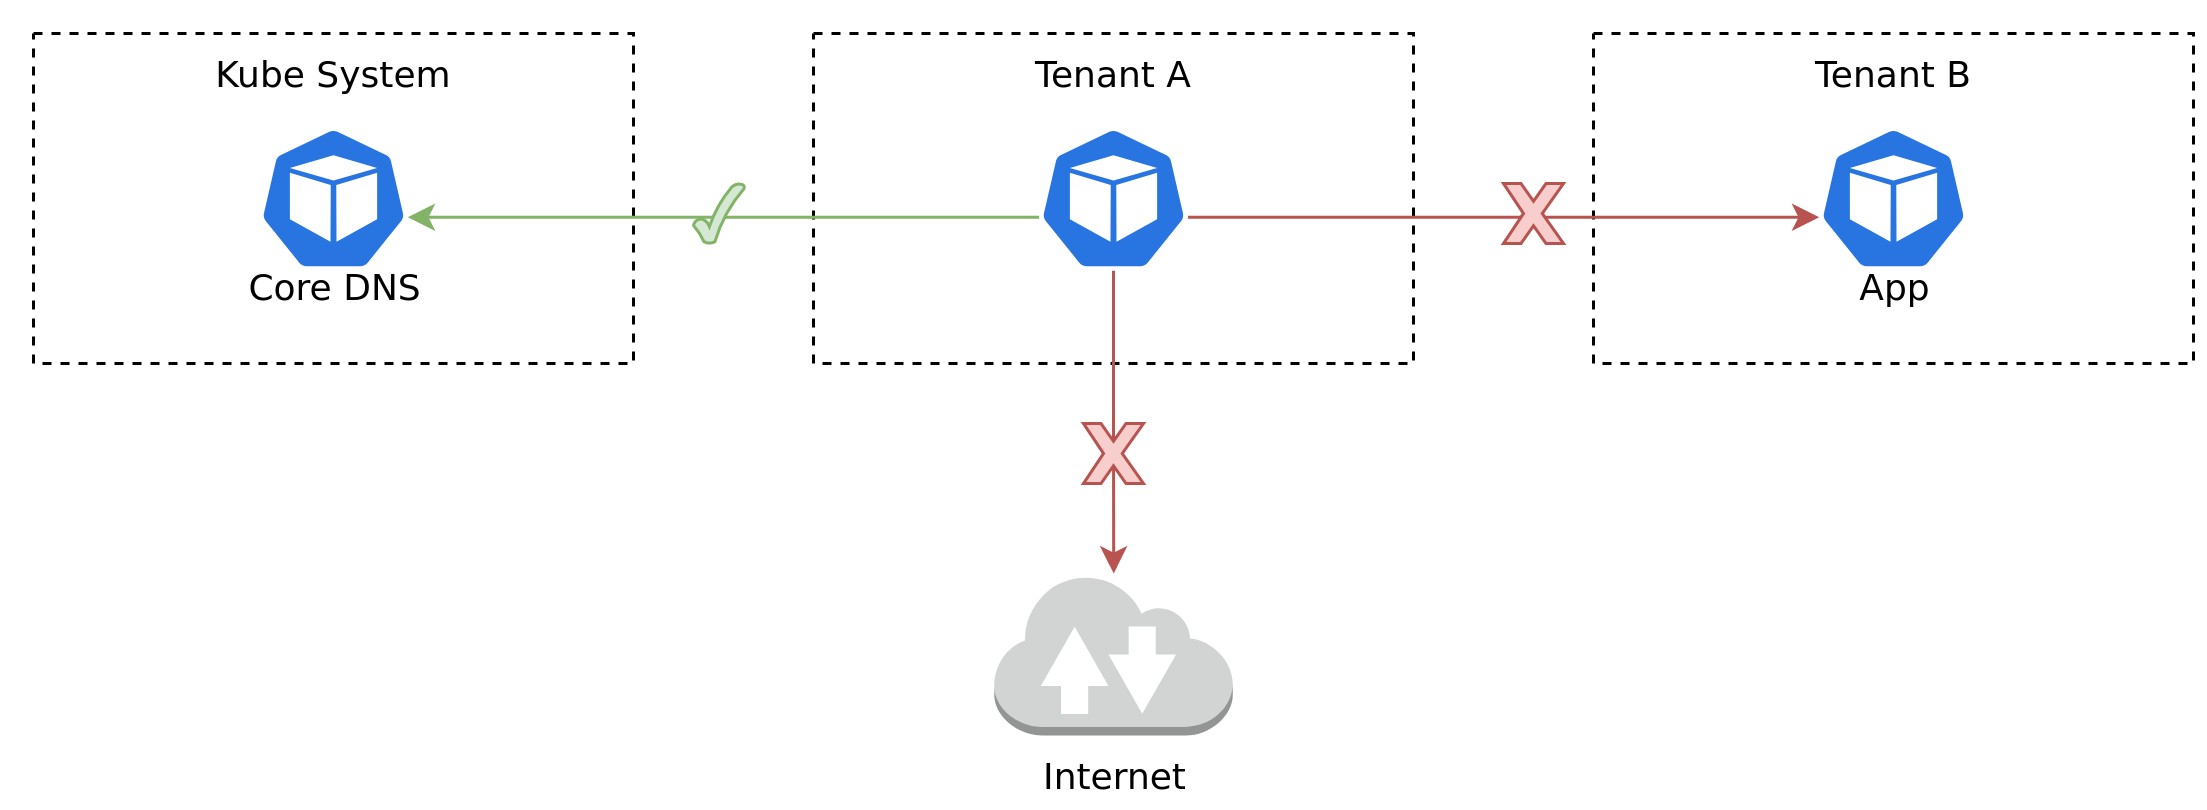
The default deny Network Policy contains an exception for traffic destined to the cluster's DNS service. Without this exception DNS resolution would not work. The Pod selector in the Network Policy is empty, this means that the Network Policy will apply for all Pods in the namespace.
apiVersion: networking.k8s.io/v1
kind: NetworkPolicy
metadata:
  name: default-deny
  namespace: tenant
spec:
  egress:
    - ports:
        - port: 53
          protocol: UDP
      to:
        - namespaceSelector: {}
          podSelector:
            matchLabels:
              k8s-app: kube-dns
    - to:
        - podSelector: {}
  ingress:
    - from:
        - podSelector: {}
  podSelector: {}
  policyTypes:
    - Ingress
    - Egress
There may come a time when you have to create new Network Policies to allow specific Pods traffic, as the default can be pretty restrictive. A common situation when this is required is when a Pod needs to communicate with the public Internet, or communicate with other Pods in other tenant namespaces. When creating new Network Policies make sure that you do not open up more than is actually required. A good source of example Network Policies is the Github repository kubernetes-network-policy-recipes. It contains a lot of good examples with diagrams and descriptions. The examples found there contain the most common use cases to make things simpler for you.
A helpful tool when create new Network Policies is the Cilium Network Policy Editor.
Examples
Allow Internet Egress
A common scenario is opening up traffic to the public Internet. A current limitation with Network Policies today is that it is not possible to create egress rules based on DNS names. This means that the simplest solution is to allow traffic to all public IPs, as trying to resolve the DNS to an IP would only work short term.
apiVersion: networking.k8s.io/v1
kind: NetworkPolicy
metadata:
  name: allow-internet-egress
spec:
  egress:
    - to:
        - ipBlock:
            cidr: 0.0.0.0/0
  podSelector:
    matchLabels:
      app: foo
  policyTypes:
    - Egress
Allow Ingress Nginx
Traffic from the ingress controller has to be explicitly allowed as no traffic is allowed from outside the namespace by default. This can be considered a fail-safe to protect against accidental Ingress creation, where an application is exposed to the Internet when that was not the intent. It is enough to allow ingress from the ingress controller even if the traffic actually originates from outside the cluster.
apiVersion: networking.k8s.io/v1
kind: NetworkPolicy
metadata:
  name: allow-ingress-controller
spec:
  ingress:
    - from:
        - namespaceSelector:
            matchLabels:
              name: ingress-nginx
  podSelector:
    matchLabels:
      app: foo
  policyTypes:
    - Ingress
Allow Cross Namespace
When allowing network traffic across tenant namespaces considerations have to be made for the default deny Network Policy in both namespaces. An allow rule has to be created to allow the source namespace (the side initating the connection) to send traffic to the destination namespace. The destination namespace has to allow traffic from the source namespace. The first Network Policy should be used in the source namespace and the second should be used in the destination namespace.
apiVersion: networking.k8s.io/v1
kind: NetworkPolicy
metadata:
  name: allow-egress-to-destination
  namespace: source
spec:
  egress:
    - to:
        - namespaceSelector:
            matchLabels:
              name: destination
          podSelector:
            matchLabels:
              app: bar
  podSelector:
    matchLabels:
      app: foo
  policyTypes:
    - Egress
apiVersion: networking.k8s.io/v1
kind: NetworkPolicy
metadata:
  name: allow-ingress-from-source
  namespace: destination
spec:
  ingress:
    - from:
        - namespaceSelector:
            matchLabels:
              name: source
          podSelector:
            matchLabels:
              app: foo
  podSelector:
    matchLabels:
      app: bar
  policyTypes:
    - Ingress
Debugging
TBD
Ingress and Gateway API
XKS uses the Kubernetes Gateway API as the modern standard for managing ingress traffic, with Envoy Gateway as the implementation. Gateway API is the successor to the traditional Ingress API and provides a more powerful, flexible, and extensible way to configure traffic routing into your Kubernetes cluster.
Gateway API
The Gateway API provides:
- Role-oriented design: Clear separation between infrastructure providers, cluster operators, and application developers
- Enhanced expressiveness: Native support for header-based routing, traffic splitting, request mirroring, and more
- Better extensibility: Uses typed Kubernetes resources instead of implementation-specific annotations
- Protocol support: Built-in support for HTTP, HTTPS, TCP, TLS, UDP, and GRPC
- Future-proof: Officially maintained by Kubernetes SIG Network and graduated to GA status
For comprehensive documentation on using Gateway API in XKS, including examples, advanced features, and usage patterns, see the Gateway API Developer Guide.
Refer to the official Gateway API documentation for the complete specification and community resources.
Envoy Gateway
XKS uses Envoy Gateway as the implementation of the Gateway API standard. Envoy Gateway leverages Envoy Proxy, a modern, cloud-native proxy designed for high-performance scenarios.
Key capabilities:
- Dynamic configuration without downtime
- Native Gateway API support
- Advanced traffic management (circuit breaking, sophisticated retries, multiple load balancing algorithms)
- Rich observability (metrics, distributed tracing, structured logging)
- Service mesh ready architecture
For details on Envoy Gateway features, policies, observability, performance tuning, and troubleshooting, see the Envoy Gateway Guide.
For Envoy internals and advanced configuration, refer to:
Ingress Nginx Deprecation
⚠️ IMPORTANT: The traditional Ingress API with Nginx Ingress Controller is deprecated in XKS and will be removed in a future release.
What this means:
- Existing Ingress resources continue to work during the migration period
- All new applications should use Gateway API
- Migration assistance is available from the XKS platform team
Migration Resources:
- Ingress Nginx Migration Guide - Complete deprecation information, timelines, step-by-step migration instructions, and annotation mapping
- Gateway API Guide - Side-by-side Ingress to HTTPRoute examples
For official deprecation information and Kubernetes community guidance:
Ingress (Legacy)
Note: This section documents the legacy Ingress API for reference. New applications should use Gateway API instead.
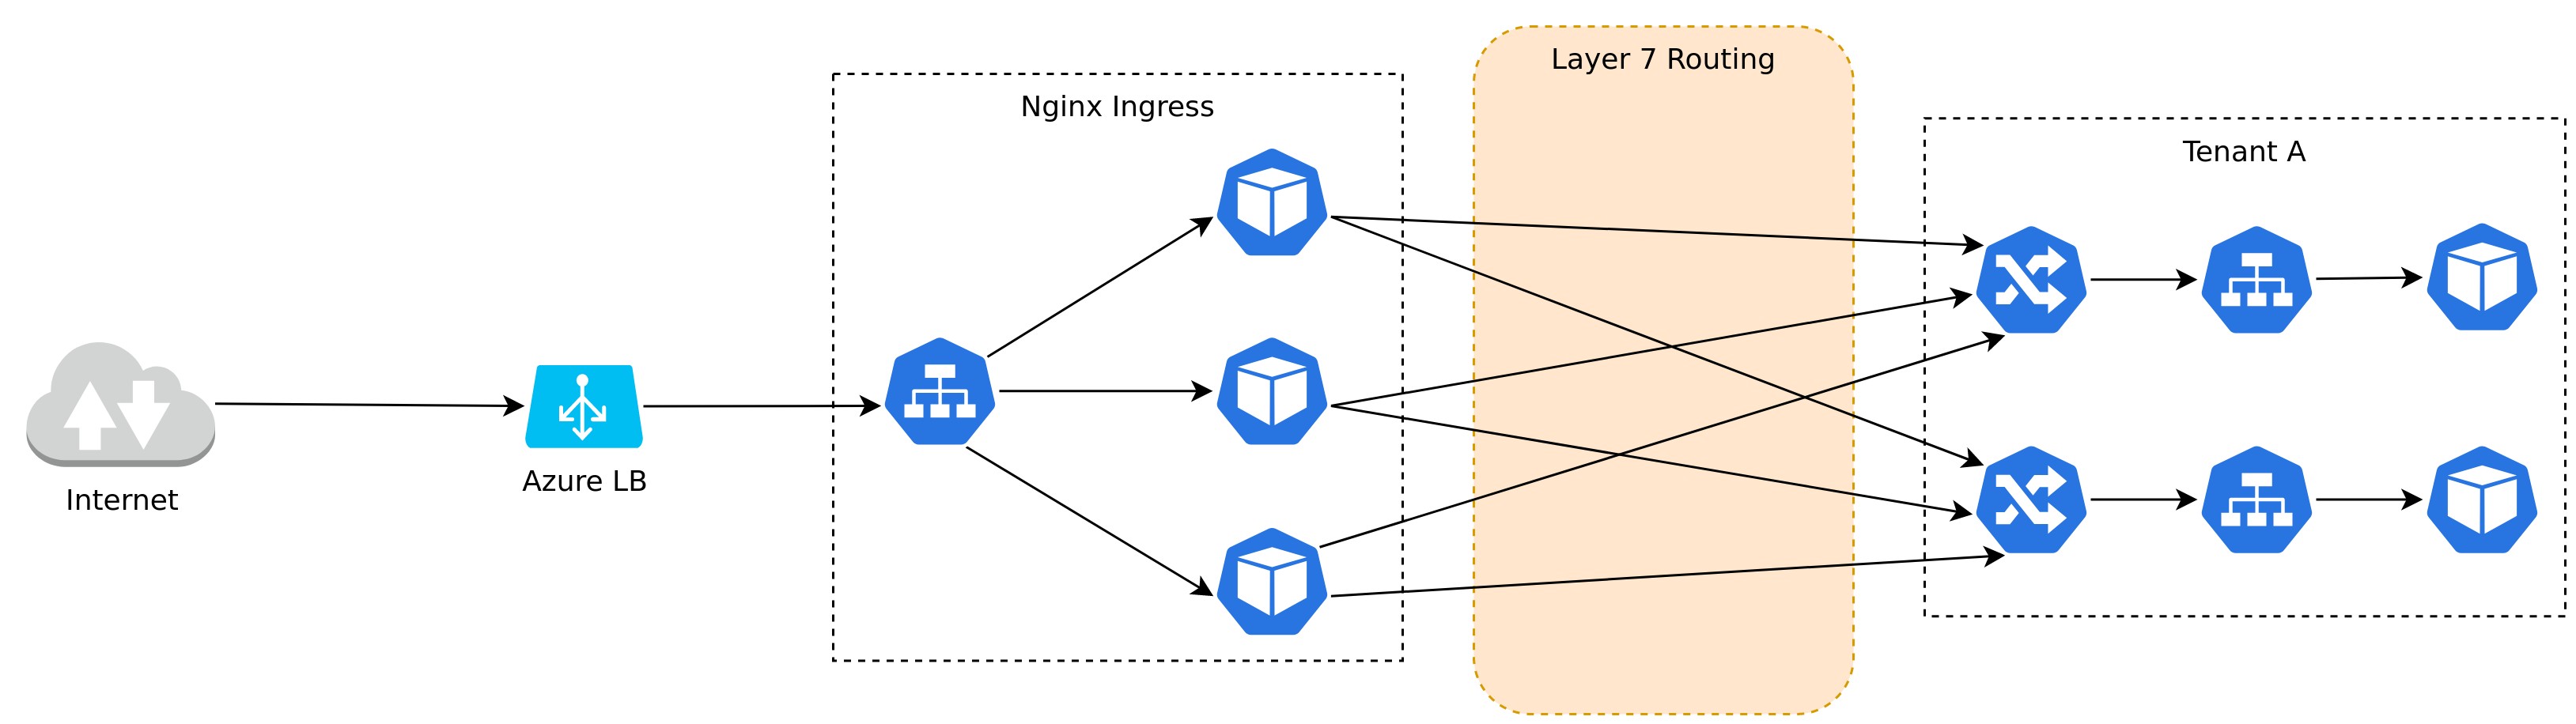
Ingress in Kubernetes is used to allow network traffic from the outside the cluster to reach Pods inside the cluster. Ingress works as a layer on top of Kubernetes Services by exposing the Service with a hostname. All Ingress traffic is Layer 7 routed, meaning that traffic is routed based on the host header in the HTTP request. This also means that Ingress only works with HTTP traffic. Doing it this way means that only a single load balancer is required reducing cost compared to running multiple load balancers, one per Ingress.
XKS comes with everything pre-configured for Ingress to work. The cluster will either have a single Nginx Ingress Controller which is exposed to the public Internet or two controllers where one is public and one is private. On top of that the cluster is configured with External DNS(which creates DNS records) and Cert Manager (which deals with certificate creation and renewal). Together these three tools offer an automated solution where the complexity of DNS and certificates are not handled by the application. The recommendation is to always enable TLS for all Ingress resources no matter how small the service is. Updating a certificate is quick and easy so there is no reason not to do this. Every XKS cluster comes with a preconfigured Cluster Issuer which will provision certificates from Let's Encrypt.
Start off by creating a Certificate resource for your Ingress. It is possible to have Cert Manager automatically create a Certificate when an Ingress resource is created. This however has the downside that every Ingress resource will receive its own Certificate. Lets Encrypt has rate limits for the same domain, if one were to create a Certificate per ingress that rate limit would be hit pretty quickly. For this reason it is better to create a shared Certificate per tenant namespace with multiple DNS names instead. Each DNS name will be present in the Certificate so that it can be used for multiple Ingress resources. When the Certificate is provisioned it will be written to a Secret.
apiVersion: cert-manager.io/v1
kind: Certificate
metadata:
  name: shared
  namespace: tenant
spec:
  issuerRef:
    group: cert-manager.io
    kind: ClusterIssuer
    name: letsencrypt
  dnsNames:
    - app-one.example.com
    - app-two.example.com
  secretName: shared-cert
To complete the ingress configuration an Ingress resource has to be created. The Ingress resource defines the Service where the traffic should be routed to and the DNS name which should resolve to
that Service. An additional configuration is the TLS configuration which configures the certificate to use. Cert Manager writes the certificate data to a Secret which is configured in the Certificate
secretName. That same Secret should be referenced in the TLS configuration. A DNS record will be automatically created when the Ingress is applied to the cluster.
apiVersion: networking.k8s.io/v1
kind: Ingress
metadata:
  name: app-one
  namespace: tenant
spec:
  rules:
    - host: app-one.example.com
      http:
        paths:
          - path: /
            backend:
              service:
                name: app-one
                port:
                  name: http
  tls:
    - hosts:
        - app-one.example.com
      secretName: shared-cert
Public and Private Ingress
By default an XKS cluster will deploy a single public Ingress controller. All Ingress resources will be routed with a public IP and therefore exposed to the public Internet. It is however also possible to
create private Ingress resources which are only exposed through an IP that is private to the virtual network in which the Kubernetes cluster is deployed. This is an opt in feature
as two load balancing services are needed. Making an Ingress private is simple when the private Ingress feature is enabled. All that is required is that the Ingress class has to be set
to nginx-private, this makes sure that the resource is only served through the private IP.
apiVersion: networking.k8s.io/v1
kind: Ingress
metadata:
  name: app-one
  namespace: tenant
spec:
  ingressClassName: nginx-private
  rules:
    - host: app-one.example.com
      http:
        paths:
          - path: /
            backend:
              service:
                name: app-one
                port:
                  name: http
  tls:
    - hosts:
        - app-one.example.com
      secretName: shared-cert
External Routing
There is no requirement that the destination for an Ingress resource has to be served from within the cluster. It is possible to route Ingress traffic either to endpoints outside of the cloud provider or to another service that is only accessible from within the private network. Using the XKS Ingress instead of a separate solution has it's benefits in these situations, as DNS record creation and certificate management is already setup to work. A typical use case may be during a migration period when XKS and another solution may exist in parallel. All traffic can enter through XKS but then be forwarded to the external destination. The service endpoints can be updated as applications are migrated to run inside XKS instead of outside.
A Service resource is required to configure the destination of the traffic. There are two options available in Kubernetes when directing traffic outside of the cluster. The first option is to create a Service of type ExternalName which specifies a host name which the Service should write to. When a request is made to the Service the given external name IP will be resolved and the request will be sent to that destination.
apiVersion: v1
kind: Service
metadata:
  name: to-external
spec:
  type: ExternalName
  externalName: example.com
The other option is to create a Service which routes to a static IP. This is implemented with a Serivce without an external name or label selector, then also creating an Endpoint for the Service.
This way the Service will only resolve to the static IP given, in this case the static IP is 1.2.3.4 and the port is 443.
apiVersion: v1
kind: Service
metadata:
  name: to-external
spec:
  ports:
    - protocol: TCP
      port: 443
---
apiVersion: v1
kind: Endpoints
metadata:
  name: to-external
subsets:
  - addresses:
      - ip: 1.2.3.4
    ports:
      - port: 443
The Serivce resources only solve half the problem as they are only accessible within the cluster. They have to be exposed with an Ingress resource to solve the other half, so that on host name
can be translated to another. The example assume that all traffic is expected to be HTTPS on both ends. The Ingress below exposes the Service named to-external on the port 443 with the host
name forward.xenit.io. It also assumes that a TLS Secret exists which is valid for the Ingress host name.
apiVersion: networking.k8s.io/v1
kind: Ingress
metadata:
  name: forward-traffic
  annotations:
    nginx.ingress.kubernetes.io/backend-protocol: "HTTPS"
    nginx.ingress.kubernetes.io/upstream-vhost: "forward.xenit.io"
spec:
  rules:
    - host: forward.xenit.io
      http:
        paths:
          - pathType: Prefix
            path: /
            backend:
              service:
                name: forward-traffic
                port:
                  number: 443
  tls:
    - hosts:
        - forward.xenit.io
      secretName: to-external
The only major changes with the Ingress compared to a "normal" Ingress resource are the annotations. The annotations nginx.ingress.kubernetes.io/backend-protocol: "HTTPS" makes sure that the traffic
on the backend is sent as HTTPS traffic. Without this annotation there is a risk that the backend traffic could be transported as HTTP. The second annotations
nginx.ingress.kubernetes.io/upstream-vhost: "forward.xenit.io" specifies the host header set in the upstream request. This annotation is not necessarily required for all external endpoints, but a lot
of endpoints resolve their routing through layer 7 which means that the host header has to be set properly. A good practice is to set the annotation value to be the same as the external name.
Another use case is to rewrite the request paths. This is possible through the nginx.ingress.kubernetes.io/rewrite-target which can allow for complex path modification logic. For details how to
use the annotation refer to the documentation.
Rate Limiting
At times it is beneficial to rate limit the amount of requests that reach an internal application from the Internet. Rate limiting can be configured to act based on different parameters. Rate limiting
is configured for an Ingress through the use of annotations. The annotations nginx.ingress.kubernetes.io/limit-connections limits the amount of concurrent connections allowed from a single source IP.
The other annotation nginx.ingress.kubernetes.io/limit-rps sets a limit for the amount of requests per second that can be sent from a single source IP. These two strategies do not work together, you
have to decide on one or the other. Below is an example of a Ingress which limits the amount of concurrent connections.
apiVersion: networking.k8s.io/v1
kind: Ingress
metadata:
  name: example
  annotations:
    nginx.ingress.kubernetes.io/limit-connections: 10
spec:
  rules:
    - host: example.com
      http:
        paths:
          - path: /
            backend:
              service:
                name: example
                port:
                  name: http
  tls:
    - hosts:
        - example.com
      secretName: cert
For more information refer to the official documentation.
Nginx Configuration
It is useful to be aware of annotation configuration in the Nginx ingress controller. Sometimes a specific Ingress requires custom behavior that is not default in the ingress controller, this behavior can be customized with the help of annotations for a specific Ingress resource. For example, changing the client body buffer size may be useful if the header size in the expected requests is larger than the buffer.
apiVersion: extensions/v1beta1
kind: Ingress
metadata:
  name: foo
  namespace: bar
  annotations:
    nginx.ingress.kubernetes.io/client-body-buffer-size: 1M
spec:
  rules:
    - host: foo.dev.example.com
      http:
        paths:
          - backend:
              serviceName: foo
              servicePort: http
  tls:
    - hosts:
        - foo.dev.example.com
Debugging
Common networking problems include forgetting to set up egress or ingress rules that apply for your pods - or setting them up and then having the requirements change, which then causes connection errors.
Remember that you can inspect your network policies with kubectl get networkpolicies. If you cannot see your policy there, verify if it is actually present in your kustomization.yaml file.
Linkerd
Linkerd is an optional service mesh that can be added to XKS. The component is opt-in as it adds a certain amount of overhead, so unless it has been requested Linkerd will not be present in XKS. A service mesh extends the networking functionality in a Kubernetes cluster. It is useful when features such as end-to-end encryption or GRPC load balancing is required. Linkerd will automatically handle TCP loadbalancing so when GRPC is used Linkerd will detect this and loadbalance between instances of GRPC servers.
Refer to the official documentation for documentation that may be missing from this page.
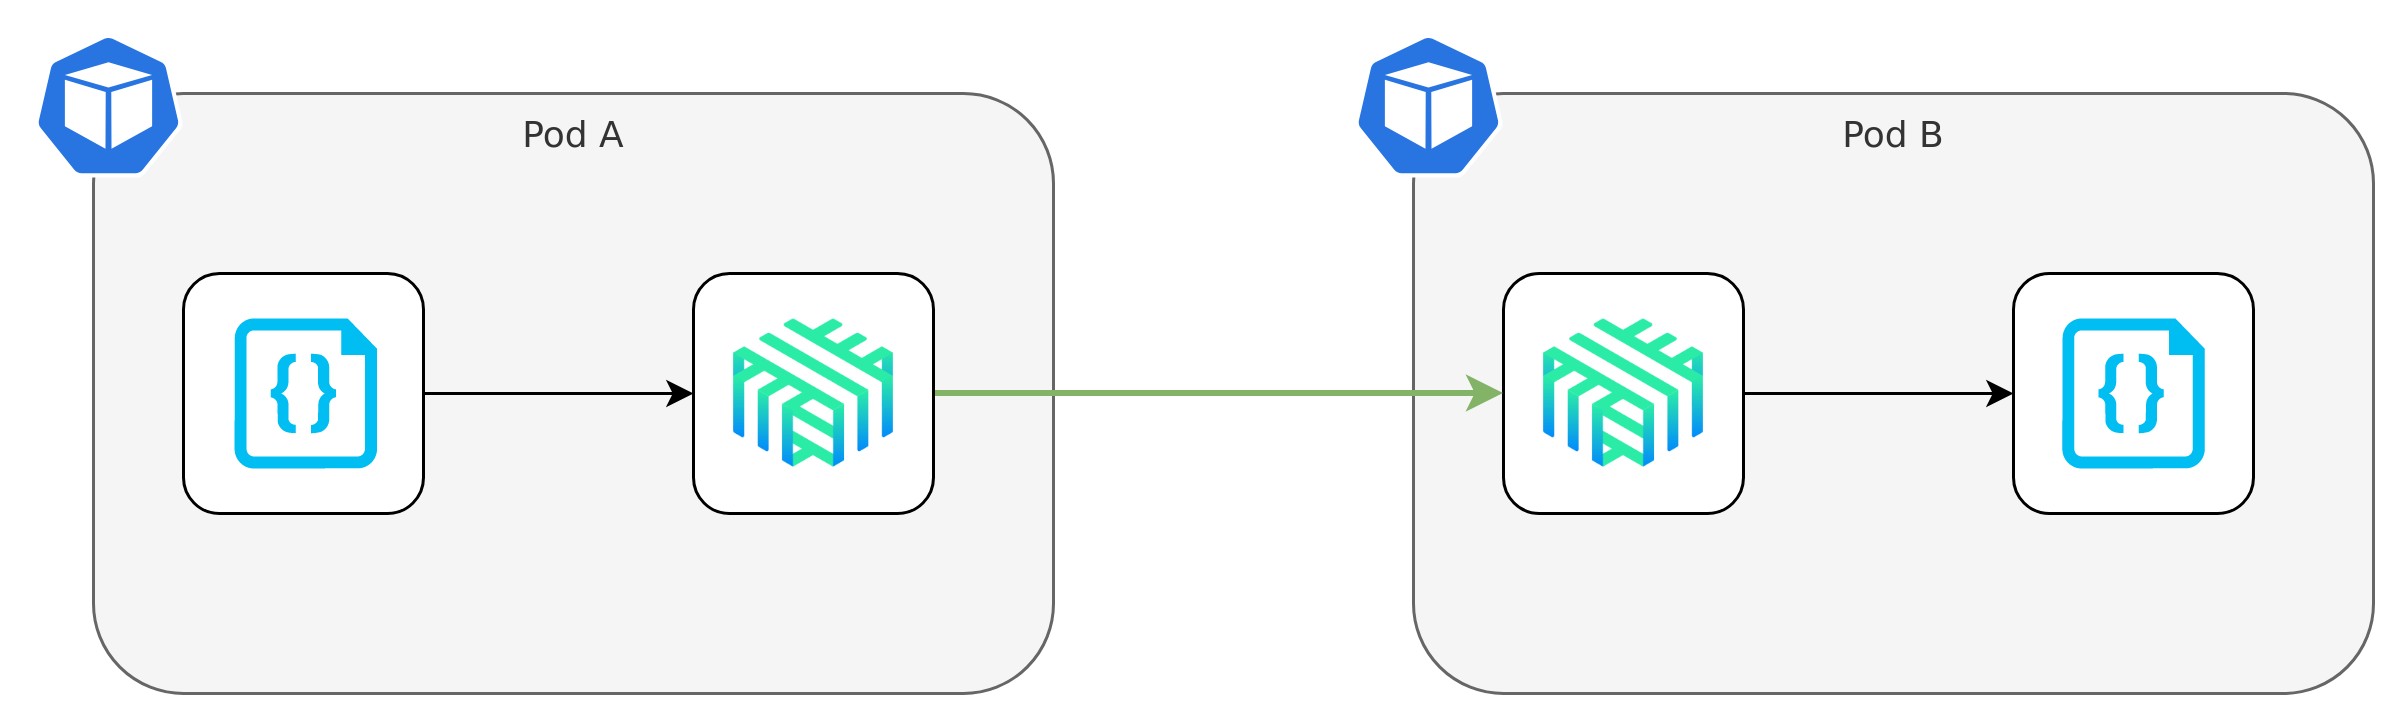
Linkerd works by injecting a sidecar into every Pod which uses Linkerd. All network requests have to be sent through the sidecar which will then be responsible for forwarding it. The sidecar will handle things like traffic encryption before sending the packets outside of the node.
Get Started
To enable sidecar injection the Pod has to have the annotation linkerd.io/inject: enabled added to it. A common mistake when enabling Linkerd is
that the annotation is added to Deployment and not the Pod template, make sure that you do not do this as the sidecar will not be injected if
you do.
apiVersion: apps/v1
kind: Deployment
metadata:
  name: linkerd-test
spec:
  replicas: 1
  selector:
    matchLabels:
      app: linkerd-test
  template:
    metadata:
      annotations:
        linkerd.io/inject: enabled
      labels:
        app: linkerd-test
    spec:
      containers:
        - name: linkerd-test
          image: alpine:latest
          ports:
            - containerPort: 8080
              name: http
              protocol: TCP
Eventually a Pod should be created. An important detail is that there should be two containers in the Pod. One container should be the one defined in the Deployment and the other one the Linkerd sidecar. This can be verified by getting the Pod's containers:
$ kubectl get pods <POD_NAME> -o jsonpath="{.spec.containers[*].name}"
linkerd-test linkerd-proxy
With the sidecar added all traffic going out of the container will automatically be proxied through the sidecar.
FAQ
Is all network traffic encrypted?
No, it depends on the traffic type and is something that should be verified rather than assumed. More information can be found in the Linkerd documentation.
What overhead can I expect?
Each Pod will at a minimum consume an additional 10 MB due to the extra sidecar, and the number can grow as traffic increases.