Scheduling and Scaling
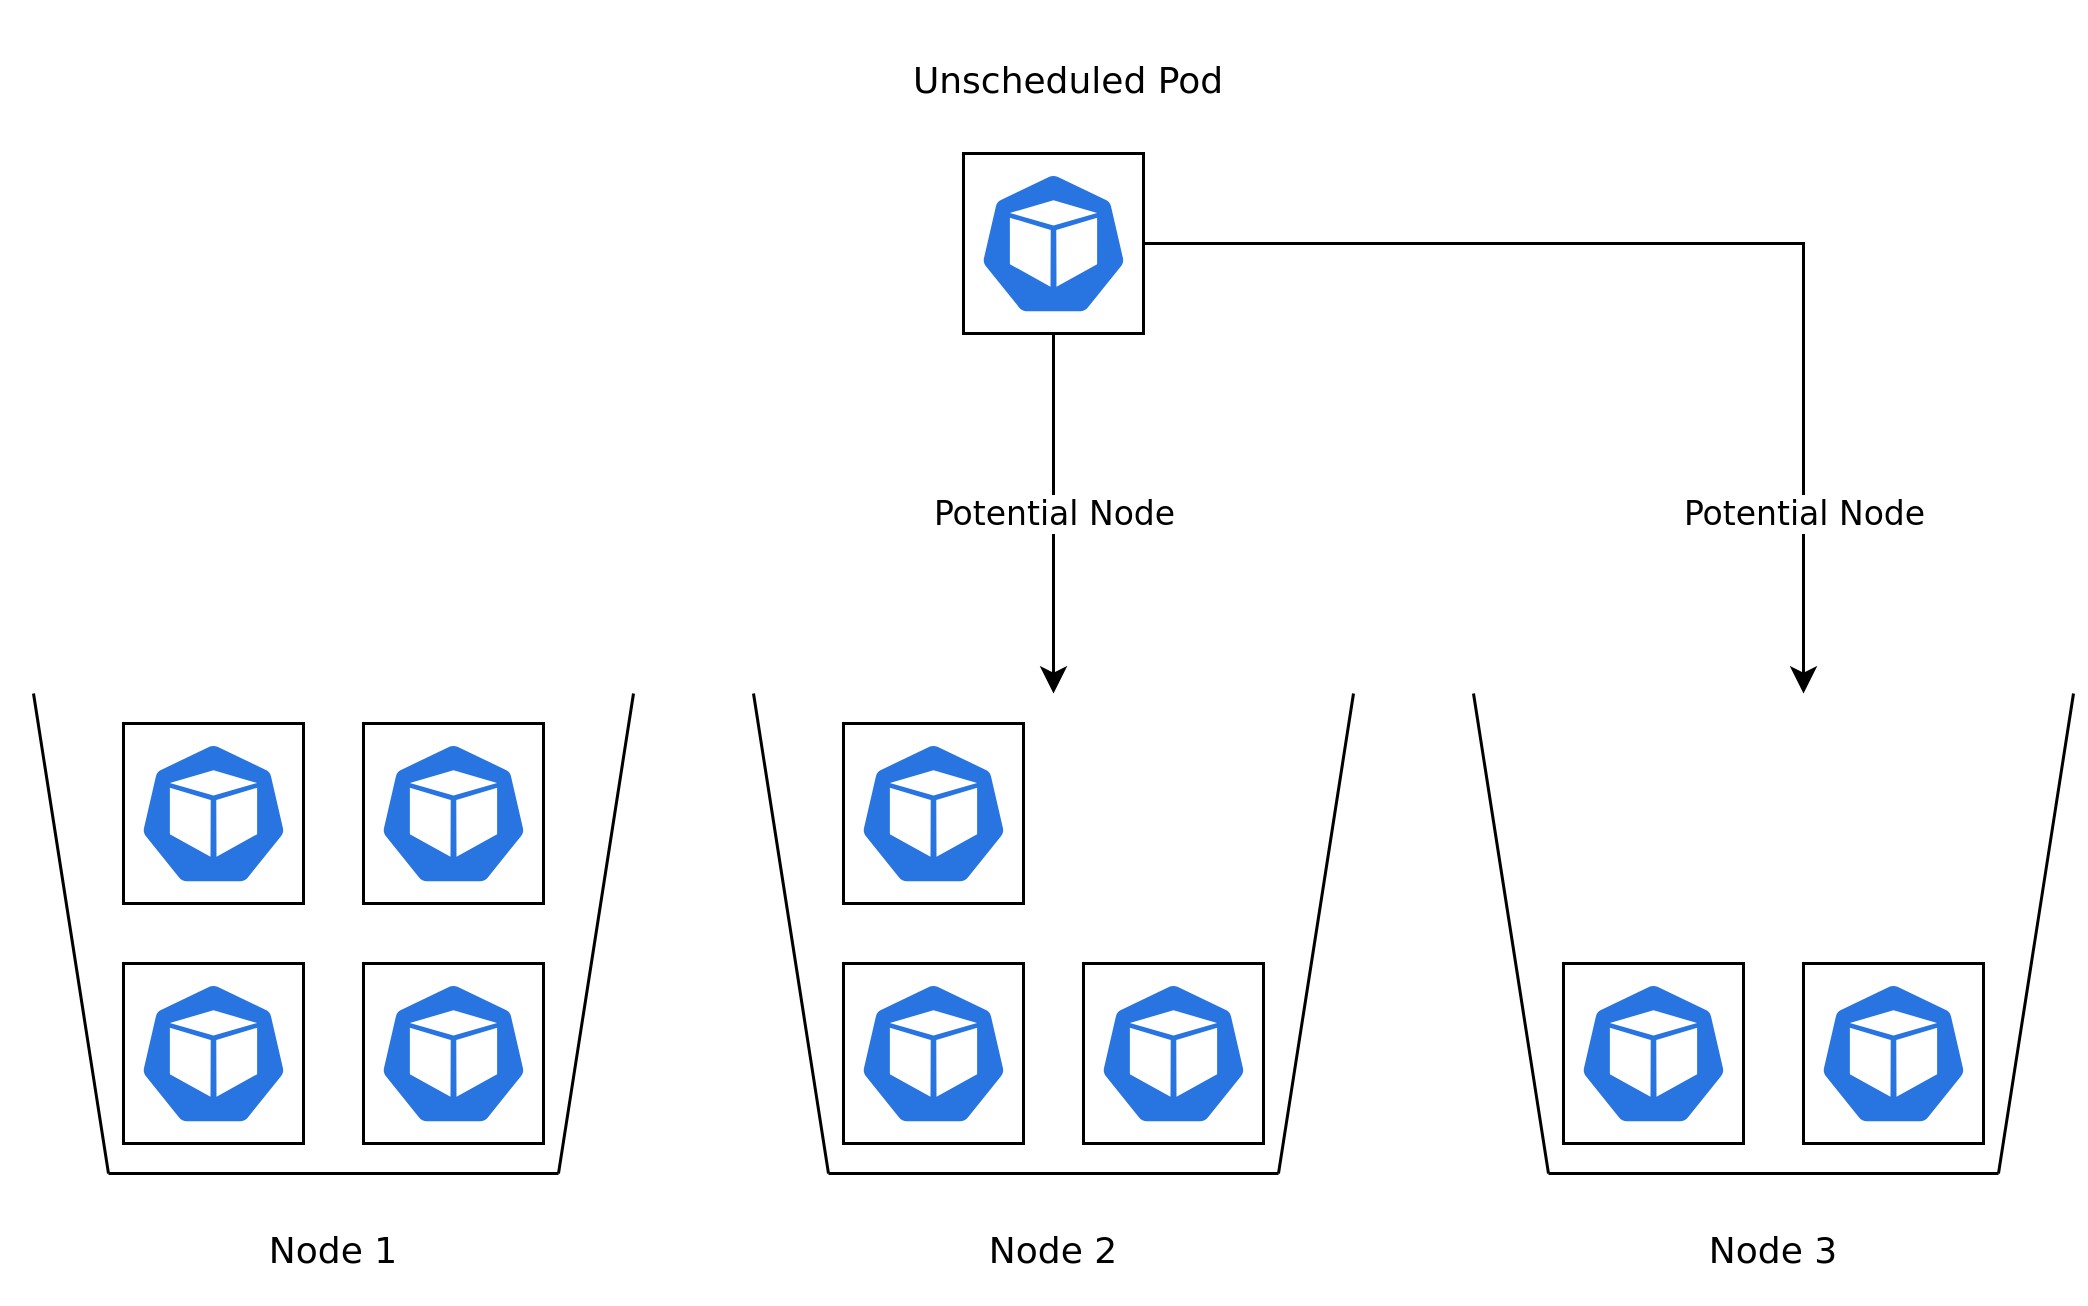
The Kubernetes scheduler is responsible for assigning new Pods to Nodes. This functionality is a core component of Kubernetes. The Kuberetes Scheduler in its simplest form assigns Pods based on two main criteria.
- Filtering - Checks Nodes for available resources and if they meet the requirements of the Pod.
- Scoring - Ranks the filtered Nodes and chooses the highest ranked one.
Most Kubernetes users encounter the scheduler for the first time when creating either a Deployment or Pod. The scheduler has to decide which Node to assign the Pod to. In the case of a Deployment the replica count can be increased and decreased at a moment's notice by the user. When replica is changed for example from three to twenty the scheduler will have a lot of Pods all of a sudden to assign to Nodes. Having a deeper understanding of the Kubernetes scheduler will allow for efficient resource consumption and debugging any scheduling issues. This section will give an overview overscheduling and scaling features in Kubernetes and how they relate to each other.
Pod Resources
Setting good resource requests and limits for a container is an important component in helping the scheduler select the correct Node to schedule a Pod to. There are two types of resource configuration fields, and these are configured for each container in a Pod.
The resource request tells the scheduler how much of each resource each container in a Pod is expected to consume, though a Pod is allowed to consume more. The limit sets the maximum amount of resources each container in a Pod can consume. There are two main resource types that one should be aware of, CPU and memory.
The CPU resource is defined in CPU units where one CPU unit is the equivalent of one CPU core. Fractional units can also be requested, in either decimals like 0.1 but also in terms of millicores where 100m would be the same amount. The memory resource is defined in whole integers with the quantity suffixes
Ei, Pi, Ti, Gi, Mi, Ki.
If you do not specify any resources for a container the default resource request and limit will be applied as shown below. These resources are low on purpose, both to minimize the effects of overprovisioning but also to make it obvious for XKF users that resources have not been specified. The keen-eyed may notice that a CPU limit is not set by default, this is on purpose and the reasons for it will be discussed later.
resources:
  request:
    cpu: 50m
    memory: 32Mi
  limits:
    memory: 256Mi
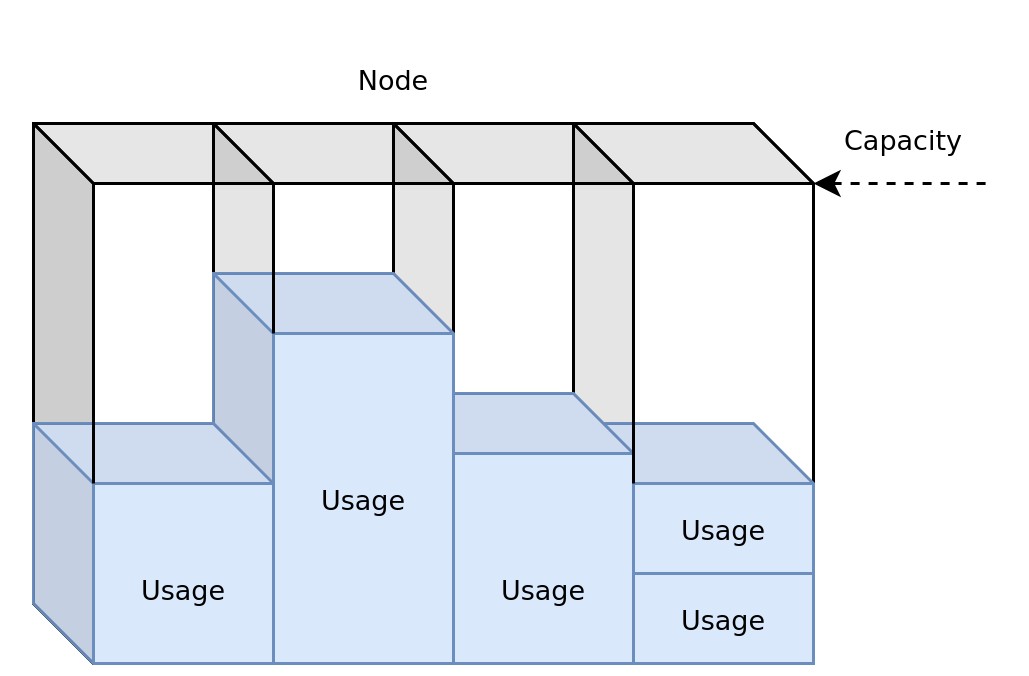
The scheduler will look at the cumulative resource requests across all containers in a Pod during the scheduling phase. The scheduler will exclude any Node which does not have capacity for the Pods resource request. Capacity is determined based on the total resources available in a Node minus the sum of all the resource requests of all Pods currently scheduled to the Node. A Pod may at times request more resource than any Node has capacity for, there are two possible outcomes for this situation. If the Pods resource request is less than a Nodes total available resources, a new Node will be added to the cluster. The Pod will however be considered unschedulable if the resource request exceeds the total resources available on a single node. In these cases either the resource request has to change or a new Node type has to be added to the cluster to cater to these needs.
It is possible to overprovision Node resources in cases where the resource request for each container is much larger that the actual resource consumption. Efficient resource allocation is a constant battle between requesting enough resources to avoid under allocation while not requesting too much which would result in overallocation. The easiest way to think about resources consumption and availability is to imaging the capacity as a glass, as more resources are consumed water is added to the glass. If the consumption increase does not stop the glass will eventually overfill.
The resource limit defined for a Pod has no affect on the scheduling of a Pod. Limits instead comes into play for a Pod during runtime. Exceeding the resource limit for CPU and memory will have different affects. A Pod which exceeds the memory limit will be terminated with an out of memory error (OOM Error). The Pod will after termination be started again, it may start to exceed the limit again which will result in another OOM error. These types of errors can either be resolved by having the application consume less memory alternatively increasing the memory limit. Without a memory limit a Pod would be able to continue consuming memory until the Node runs out. This would not only affect critical system processes that runs in the node but other Pods which may not even be able to consume the resources it requested.
CPU limits should be treated slightly differently from memory limits. When memory is overconsumed applications will crash when there is no place to store new data. However when CPU is overconsumed throttling will occur. Applications will not immediately crash even if performance may be severely deprecated. CPU differs from memory as a resource in the sense that CPU time will be wasted if not consumed and applications required CPU time can vary a lot. Reserving CPU time that is not used is a waste if another application would benefit from using it. Setting a CPU limit for a Pod will result in artificial CPU throttling even if it would not necessarily be required. It is for that reason that a CPU limit is not enforced for Pods by default, instead it is something that should be opted into when the effects of CPU throttling is understood. It is still important to set a reasonable CPU request for Kubernetes to determine the minimal resource requirements, but CPU limits should be avoided in most cases where it is not fully understood.
Vertical Pod Autoscaler
Defining good resource definitions is one of the hardest things that you can do in Kubernetes.
To help out with this there is something called Vertical Pod Autoscaler (VPA).
On XKF VPA is running in "Off" mode which only provide resource recommendations instead of change the resource definitions for you.
VPA uses cpu and memory usage metrics from 8:days back to recommend the resource settings.
The VPA object is automatically on all your deployments in XKF with the help of Fairwinds Goldilocks.
To view the VPA recommendations:
$ kubectl get vpa
NAME             MODE   CPU   MEM         PROVIDED   AGE
goldilocks-debug Off    15m   36253748    True       1d
goldilocks-lab   Off    11m   12582912    True       21d
To get a detailed overview of add -o yaml.
$ kubectl get vpa goldilocks-debug -o yaml
apiVersion: autoscaling.k8s.io/v1
kind: VerticalPodAutoscaler
metadata:
  labels:
    creator: Fairwinds
    source: goldilocks
  name: goldilocks-debug
spec:
  targetRef:
    apiVersion: apps/v1
    kind: Deployment
    name: debug
  updatePolicy:
    updateMode: "Off"
status:
  conditions:
  - lastTransitionTime: "2022-07-11T14:14:08Z"
    status: "True"
    type: RecommendationProvided
  recommendation:
    containerRecommendations:
    - containerName: debug
      lowerBound:
        cpu: 15m
        memory: "36253326"
      target:
        cpu: 15m
        memory: "36253748"
      uncappedTarget:
        cpu: 15m
        memory: "36253748"
      upperBound:
        cpu: 15m
        memory: "36464648"
Overall target is the value that is recommended to follow.
VPA isn't perfect and should be seen as a guide in helping you setting resource definitions.
Scheduling on Specific Nodes
Node Selectors are the easiest may to make sure that a Pod runs on a specific Node. It is a label selector which filters out which Nodes the Pod can be scheduled to. Any Node which does not match the label selector will not be considered for scheduling.
A Pod with a Node Selector which does not match with any Node will never be scheduled.
Given the two nodes with different values for the agentpool label.
apiVersion: v1
kind: Node
metadata:
  name: aks-standard-node
  labels:
    agentpool: standard
---
apiVersion: v1
kind: Node
metadata:
  name: aks-memory-node
  labels:
    agentpool: memory
The Node Selector would make sure that the Pod would only be scheduled on the second Node aks-memory-node and never on the first Node.
apiVersion: v1
kind: Pod
metadata:
  name: app
spec:
  nodeSelector:
    agentpool: memory
Affinity and Anti Affinity
This is similar to nodeSelector bur greatly enhances the types of constraints you can express.
- The affinity/anti-affinity language is more expressive. The language offers more matching rules.
- Rules can be "preferred" rather than hard requirements, so if the scheduler can't satisfy them, the pod will still be scheduled
- You can constrain against labels on other pods running on the node (or other topological domain), rather than against labels on the node itself.
Nodes
There are currently two types of node affinity, called requiredDuringSchedulingIgnoredDuringExecution and preferredDuringSchedulingIgnoredDuringExecution. You can think of them as "hard" and "soft" requirements to schedule a pod. The IgnoredDuringExecution part of the names means that if labels on a node change at runtime such that the affinity rules on a pod are no longer met, the pod continues to run on the node.
spec:
  affinity:
    nodeAffinity:
      requiredDuringSchedulingIgnoredDuringExecution:
        nodeSelectorTerms:
        - matchExpressions:
          - key: kubernetes.io/name
            operator: In
            values:
            - ABC
            - XYZ
      preferredDuringSchedulingIgnoredDuringExecution:
      - weight: 100
        preference:
          matchExpressions:
          - key: label-key
            operator: In
            values:
            - label-value
This example only allows pods to be scheduled on nodes with a key kubernetes.io/name with value ABC or XYZ Among the nodes matching this criteria, nodes with the key label-key and the value label-value will be preferred.
The weight field is ranged 1-100 and for each node matching all scheduling requirements, the kube-scheduler computes a score, as mentioned earlier. It then adds this number to that sum to calculate the best matching node.
Pods
podAffinity and podAntiAffinity lets you constrain which nodes pods are eligible to be scheduled on based of label of the pods running on the node rather than the labels on the node.
podAnitAffinity
spec:
  affinity:
    podAffinity:
      requiredDuringSchedulingIgnoredDuringExecution:
      - labelSelector:
          matchExpressions:
          - key: label1
            operator: In
            values:
            - label-value
        topologyKey: topology.kubernetes.io/zone
    podAntiAffinity:
      preferredDuringSchedulingIgnoredDuringExecution:
      - weight: 100
        podAffinityTerm:
          labelSelector:
            matchExpressions:
            - key: label2
              operator: In
              values:
              - label-value-anti
          topologyKey: topology.kubernetes.io/zone
This shows an example where we use both affinity rules.
Affinity rule: the pod can only be scheduled onto a node if that node is in the same zone as at least one already-running pod that has a label with key label1 and value label-value.
antiAffinity rule: the pod should not be scheduled onto a node if that node is in the same zone as a pod with a label having key label2 and value label-value-anti
  affinity:
    podAntiAffinity:
      preferredDuringSchedulingIgnoredDuringExecution:
        - podAffinityTerm:
            labelSelector:
              matchExpressions:
                - key: prometheus
                  operator: In
                  values:
                    - xks
            topologyKey: kubernetes.io/hostname
          weight: 100
        - podAffinityTerm:
            labelSelector:
              matchExpressions:
                - key: prometheus
                  operator: In
                  values:
                    - xks
            topologyKey: topology.kubernetes.io/zone
          weight: 100
This is an example configuration of podAntiAffinity for Prometheus. Spreading the pod deployment based on topology.kubernetes.io/zone and topology.kubernetes.io/hostname to only allow 1 pod on each node and to mitigate downtime in case an entire zone goes down, e.g: if a pod runs in zone A with key prometheus and value xks do not schedule it in zone A - choose zone B or C. Note that these settings are "preferred" and not required.
We recommend using this configuration, as critical services should be distributed to multiple zones to minimize downtime.
You can read more about this in the official documentation.
Pod Disruption Budget
Pod Disruption Budgets are critical for any production deployment of an application. It enforces so that there are always a set amount of replicas of an application running. There is a risk that an application will during a short period of time have zero replicas running without if a Pod Disruption Budget has not been defined. XKS depends heavily on the existence of Pod Disruption Budgets to make sure that a cluster node pool can be scaled safely and upgrades can be applied to node pools without involving individual developers. During these types of event multiple Nodes will be drained. The Node will block any new Pods from being scheduled to it and start evicting all existing Pods running the Node during a drain. Without a Pod Disruption Budget all Pods belonging to the same Deployment may be stopped at the same time, before any new Pods have had the time to start. With a Pod Disruption Budget a limited amount of Pods will be stopped, and then started on a new Node. Eviction will continue with the remaining Pods after the new Pods are running and passed their readiness probe. This documentation is only relevant for applications that are deployed with multiple replicas. It is not possible to create a Pod Disruption Budget for a single replica application, one has to assume that downtime will most likely happen and an application is deployed as a single replica.
Creating a Pod Disruption Budget can be very simple. Assume a Deployment named podinfo with the label app: podinfo and a replica count of three exists in a cluster. The Pod Disruption Budget below would make sure that at least two of the replicas will be running at all times. It is important that minAvailible is always
smaller than replicas. It would be impossible to evict a Pod if the two values were equal. Removing a Pod would go against the Pod Disruption Budget, and creating an extra Pod would go against the replica count. This result is that a Node will never be able to evict Pods safely.
apiVersion: policy/v1
kind: PodDisruptionBudget
metadata:
  name: podinfo
spec:
  minAvailable: 2
  selector:
    matchLabels:
      app: podinfo
Horizontal Pod Autoscaler
A static replica count may work for a lot of applications but may not be optimal for production workloads. The goal should be to achieve good stability and latency while avoiding overprovisioning. As discussed earlier one way to scale an application is through increasing its resource requests and limits, this type of scaling is known as vertical scaling. Another option is to increase the amount of replicas instead, this type of scaling is known as horizontal scaling. Increasing the replica count will result in more Pods which can share the workload and increase the through put. Changing the replica count manually during the day would just be time consuming and impossible to achieve at scale.
The Horizontal Pod Autoscaler can do this automatically. The version autoscaling/v1 of the Horizontal Pod Autoscaler only supports scaling based on CPU utilization. Future versions will support scaling based on more metrics types.
apiVersion: autoscaling/v1
kind: HorizontalPodAutoscaler
metadata:
  name: app
spec:
  minReplicas: 1
  maxReplicas: 5
  targetCPUUtilizationPercentage: 60
  scaleTargetRef:
    apiVersion: apps/v1
    kind: Deployment
    name: app
The Pod Disruption Budget discusses the problems related to setting a minimum availability which is the same or higher than the static replica count. The same problem can occur with Horizontal Pod Autoscalers if the value is smaller than the minimum replica value.
For more details refer to the Horizontal Pod Autoscaler walkthrough.
Priority Class
The Kubernetes scheduler will out of the box treat each Pod with the same priority. The scheduler will assign Pods to Nodes in the order in which they were created, when multiple Pods without a set priority are waiting to be scheduled. This is usually not an issue as Pods tend to be assigned to Nodes quickly. However them scheduling duration may increase if multiple Horizontal Pod Autoscalers were to increase the replica count at the same time, as new Nodes would have to be provisioned first. In this case the queue would grow while waiting for more capacity in the cluster. Some applications may be more critical than others for the survival of a product. Waiting for the applications turn may not be the optimal solution if other applications have no problem waiting a bit longer to start running.
Setting Priority Class to a Pod can help the scheduler decide which Pods are more important and should be assigned to a Node first. In XKS there are three Priority Classes available.
tenant-lowtenant-mediumtenant-high
The Priority Class is set with the priorityClassName field. Always start off with using the Priority Class tenant-low, and decide later on if it should be changed. This is for the simple reason that if every Pod has a high priority no Pod will be considered of high priority as it would be the same as setting no priority
at all. Setting tenant-medium could be a good choice for applications that are user facing and may scale up and down frequently.
apiVersion: v1
kind: Pod
metadata:
  name: nginx
spec:
  priorityClassName: tenant-low
  containers:
    - name: nginx
      image: nginx
Eviction
A pod can be evicted due to many reasons. All from priority classes to memory starvation on the nodes, you can find an excellent blog about it at https://sysdig.com/blog/kubernetes-pod-evicted.
Specific workload on node pool types example
As mentioned earlier there are a number of ways scheduling workloads on different node pools. To make it a easier to understand lets provide an example.
If you want to have a batch job running on a specific node type and only your pod running on that specific node you need to set a node taint, this is done by your Kubernetes Admin. In this example the node taint is key=batch, value="true".
To schedule your pod on this node you will need to add a toleration to your pod.
apiVersion: v1
kind: Pod
metadata:
  name: example
spec:
  containers:
  - name: busybox
    image: busybox
    tty: true
    imagePullPolicy: IfNotPresent
    resources:
      requests:
        memory: 12Gi
      limits:
        memory: 22Gi
  tolerations:
  - key: "batch"
    value: "true"
    effect: "NoSchedule"
If you also want to make sure that this pod only can run on that specific node type you also have to provide a nodeSelector
apiVersion: v1
kind: Pod
metadata:
  name: example
spec:
  containers:
  - name: busybox
    image: busybox
    tty: true
    imagePullPolicy: IfNotPresent
    resources:
      requests:
        memory: 12Gi
      limits:
        memory: 22Gi
  nodeSelector:
    batch: "true"
  tolerations:
  - key: "batch"
    value: "true"
    effect: "NoSchedule"
If it's okay that your pod run on other nodes as well as the batch node you can use pod affinity.
This way your pod will be able to run even if the specific node type isn't available.
apiVersion: v1
kind: Pod
metadata:
  name: example
spec:
  containers:
  - name: busybox
    image: busybox
    tty: true
    imagePullPolicy: IfNotPresent
    resources:
      requests:
        memory: 12Gi
      limits:
        memory: 22Gi
  tolerations:
  - key: "batch"
    value: "true"
    effect: "NoSchedule"
  affinity:
    nodeAffinity:
      preferredDuringSchedulingIgnoredDuringExecution:
      - weight: 80
        preference:
          matchExpressions:
          - key: batch
            operator: In
            values:
            - "true"