Getting Started
Bootstrap
Add New Tenant
When creating a new tenant there are a number of (for now manual) processes to perform.
In this scenario we are assuming that you are using Azure DevOps and that you have already created a project and organization.
In many places in the text we have provided names, they are just examples, all of these names can be exchanged to fit your needs. In this case let us call it project1. In the future we should manually import a repository.
https://github.com/XenitAB/azure-devops-templates
Import azure-devops-templates pipeline
To make sure that the azure-devops-templates repo is up to date we have an automatic CI that fetches updates from upstream to your local Azure DevOps clone.
Go to pipelines -> New pipeline -> Azure Repos Git -> azure-devops-templates -> Existing Azure Pipelines YAML file
Import the pipeline from the following path: /.ci/pipeline.yaml
Setup XKS
In this case we will only setup a single XKS cluster in one environment, in our case dev. It is easy to add more environments when you have created your first one.
At Xenit we are using Terraform modules that we share upstream
To setup XKS we will utilize 4 modules:
- governance-global
- governance-regional
- core
- aks
Create Terraform repo
Of course we need a place to store our Terraform code so create one in your Azure DevOps organization. TODO create a example repo that uses our Terraform modules.
You can today see a example of the Makefile.
This is how we normally structure our tenant repo.
├── Makefile
├── README.md
├── aks
│   ├── main.tf
│   ├── outputs.tf
│   ├── variables
│   │   ├── common.tfvars
│   │   ├── dev.tfvars
│   │   ├── prod.tfvars
│   │   └── qa.tfvars
│   └── variables.tf
├── core
│   ├── main.tf
│   ├── outputs.tf
│   ├── variables
│   │   ├── common.tfvars
│   │   ├── dev.tfvars
│   │   ├── prod.tfvars
│   │   └── qa.tfvars
│   └── variables.tf
├── global.tfvars
├── governance
│   ├── main.tf
│   ├── outputs.tf
│   ├── variables
│   │   ├── common.tfvars
│   │   ├── dev.tfvars
│   │   ├── prod.tfvars
│   │   └── qa.tfvars
│   └── variables.tf
Update repo
We need to update a number of settings in a number of places in your Terraform repo.
Generate a SUFFIX that should be tfstate + a few random numbers, for example tfstate1234.
Update the Makefile SUFFIX variable with the suffix and the random number.
Also update global.tfvars with the same random number.
Create Terraform storage
In order to store a Terraform state we need to prepare that.
We have written a small Go tool that will help out with that.
Instead of running these scripts manually we will use the makefile.
We use one Terrafrom state per DIR and ENV.
Lets create the first Terraform state, in this case governance.
make prepare ENV=dev DIR=governance
You will need to run the prepare command for each separate Terraform folder.
Configure governance
After defining the variables and you have have applied your config:
make plan ENV=dev DIR=governance
# If everything looks good
make apply ENV=dev DIR=governance
By default you don't get access to the key vaults that governance creates. You should probably give the access to a group that you and your team have access to but to get started you can run the following.
AZ_ID=$(az ad user show --id "your@email" --output tsv --query id)
KEYVAULTNAME=kv-favorite-name
az keyvault set-policy --name $KEYVAULTNAME --object-id $AZ_ID --secret-permissions backup delete get list purge recover restore set --key-permissions backup create decrypt delete encrypt get import list purge recover restore sign unwrapKey update verify wrapKey --certificate-permissions backup create delete deleteissuers get getissuers import list listissuers managecontacts manageissuers purge recover restore setissuers update
Configure core
Get a CIDR network for your AKS env per env.
Define in core/variables/env.tfvars.
Configure AKS cluster
- How big should your cluster be?
- Which version of Kubernetes should you run?
- What DNS zone should you use?
- What SKU tier should your cluster have?
- What size should your k8s nodes have?
All of this is configured under aks/variables/prod.tfvars.
environment = "prod"
dns_zone    = "prod.aks.xenit.io"

aks_config = {
  kubernetes_version = "1.20.7"
  sku_tier           = "Free"
  default_node_pool = {
    orchestrator_version = "1.20.7"
    vm_size              = "Standard_D2as_v4"
    min_count            = 1
    max_count            = 1
    node_labels          = {}
  },
  additional_node_pools = [
    {
      name                 = "standard2"
      orchestrator_version = "1.20.7"
      vm_size              = "Standard_D2as_v4"
      min_count            = 1
      max_count            = 4
      node_labels          = {}
      node_taints          = []
    },
  ]
}
Notice the vm_size = Standard_D2as_v4
GitOps using Flux
If you want Flux to manage your GitOps repo from the get go you can enable this in aks/variables/common.tfvars.
In my case I will have Flux manage a namespace called monitor and sync a repo under monitor-gitops.
You need to create the repository in Azure Devops that you link to before applying this Terraform. The repository can be empty.
You will also need to create a separate repository for fleet-infra, this repo is used to store Flux config.
This repo cannot be empty and needs a README file or something similar to work as intended before you run Terraform.
In the example below we are using Azure DevOps as our CSM system, but we also support GitHub.
If you want to use GitHub just fill in its config and make azure_devops empty instead.
namespaces = [
  {
    name                    = "monitor"
    delegate_resource_group = true
    labels = {
      "terraform" = "true"
    }
    flux = {
      enabled = true
      azure_devops = {
        org  = "organization1"
        proj = "project1"
        repo = "monitor-gitops"
      }
      github = {
        repo = ""
      }
    }
  }
]
Terraform CI/CD
We have one CI/CD pipeline per terraform directory.
You can find ready to use pipelines under .ci/ in the Terraform repo.
Configure service principal
There are a few manual steps that you need to perform before we can start to configure the CI/CD pipeline.
Service principal access
A couple of manual steps are required before Terraform can be applied. A main service principal has to be created in the tenants Azure AD, as it will be used by the Terraform modules.
Create the new service principal. It should have a name with the format sp-sub-<subscription_name>-all-owner. Most likely the subscription name will be xks.
AZ_APP_NAME="sp-sub-<subscription_name>-all-owner"
AZ_APP_ID=$(az ad app create --display-name ${AZ_APP_NAME} --sign-in-audience AzureADMyOrg --query appId -o tsv)
AZ_APP_OBJECT_ID=$(az ad app show --id ${AZ_APP_ID} --output tsv --query id)
az ad sp create --id ${AZ_APP_OBJECT_ID}
Grant the service principal additional permissions in the App Registration. The permissions Group.ReadWrite.All and Application.ReadWrite.All in Microsoft Graph should be added. After the
permissions are added grant admin consent for the Tenant.
Make the service principal Owner of all the XKS subscriptions. This is done in the IAM settings of each individual subscription. Additionaly the service principal also needs to be member of the User
administrator role.
Create three Azure AD groups. These will be used to assing users a owner, contributor, or reader role for all resources..
az ad group create --display-name az-sub-<subscription_name>-all-owner --mail-nickname az-sub-<subscription_name>-all-owner
az ad group create --display-name az-sub-<subscription_name>-all-contributor --mail-nickname az-sub-<subscription_name>-all-contributor
az ad group create --display-name az-sub-<subscription_name>-all-reader --mail-nickname az-sub-<subscription_name>-all-reader
You can also view to original documentation on how to create a SP.
In some cases it might be useful to create a group where both a admin group for you as an admin the SP can use and assign the group the needed access.
Depending on how your global.tfvars looks like it will be called something like: az-mg-lz-xks-owner.
Create Service principal key
The SP that we use is generated by Terraform but we do not store the key anywhere, so this is among the few times that we have to do something manual.
First find the SP that you will use, this will depend on your Terraform config.
There is no CLI command to create a new key so it is done through the portal.
AAD -> App registrations -> All applications -> search for the application -> Certificates & secrets -> New client secret
The key is only shown once, so copy it some where safe for long-term storage. This key will be used when creating the service connection in Azure DevOps.
Setup Service Connection
To be able to talk from Azure DevOps to Azure and be able to run Terraform on push we need to configure service connections. Now you will also need the key that we created in the SP earlier.
Get the config:
# Service Principal Id
APP_ID=$(az ad sp list --display-name sp-sub-xks-all-owner -o tsv --query '[].appId')
# Tenant ID
TENANT_ID=$(az account show -o tsv --query tenantId)
# Subscription Id
SUB_ID=$(az account show -o tsv --query id)
In Azure DevOps: Project settings -> Service connections -> New service connection -> Azure Resource Manager -> Service principal (manual)
- Subscription Id = $SUB_ID
- Service Principal Id = $APP_ID
- Service principal key = The key created in the earlier step
- Tenant ID = $TENANT_ID
- Service connection name = xks-${environment}-owner
Update pipelines
Update the variable azureSubscriptionTemplate. You can find the value under Project settings -> Service Connections
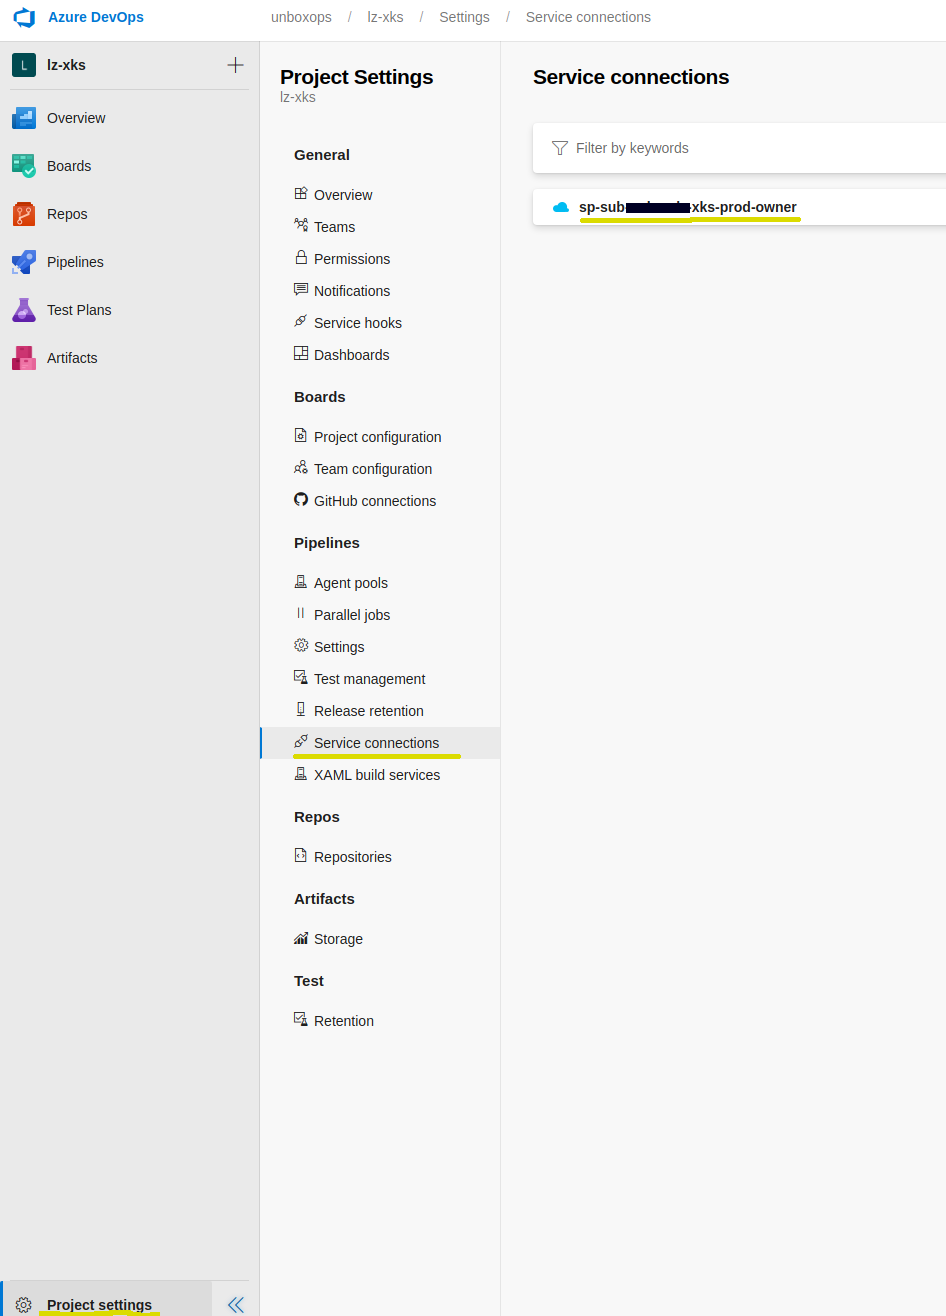
In my case sp-sub-project1-xks:
name: $(Build.BuildId)

variables:
  - name: azureSubscriptionTemplate
    value: "sp-sub-project1-xks-{0}-owner"
  - name: terraformFolder
    value: "governance"
  - name: sourceBranch
    value: "refs/heads/main"
Also update the project path in "name". Also notice the ref, the ref points to which version of the module that you are using:
resources:
  repositories:
    - repository: templates
      type: git
      name: project1/azure-devops-templates
      ref: refs/tags/2021.03.1
Add CI/CD pipelines
Once again add a pipeline.
Assuming that you named your repository to Terraform
Pipelines -> New pipeline -> Azure Repos Git -> Terraform -> Existing Azure Pipelines YAML file
Import the pipeline from the following path: .ci/pipeline-governance.yaml
Hopefully after adding the pipeline the pipeline should automatically trigger and the plan and apply stages should go through without any problems.
Create PAT secret
To make it possible for flux to clone repos from azure devops we need to create a Personal Access Token(PAT).
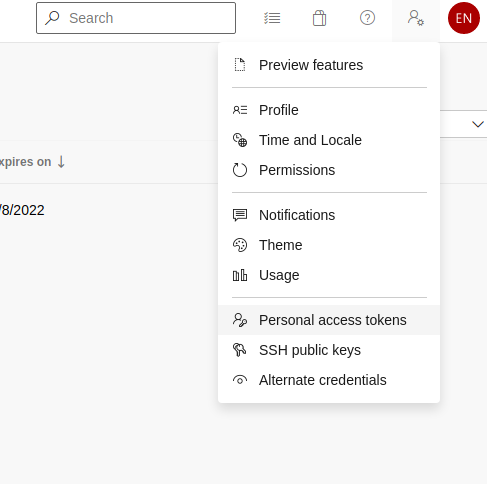
User Settings -> Personal access tokens -> New Token
Create a PAT
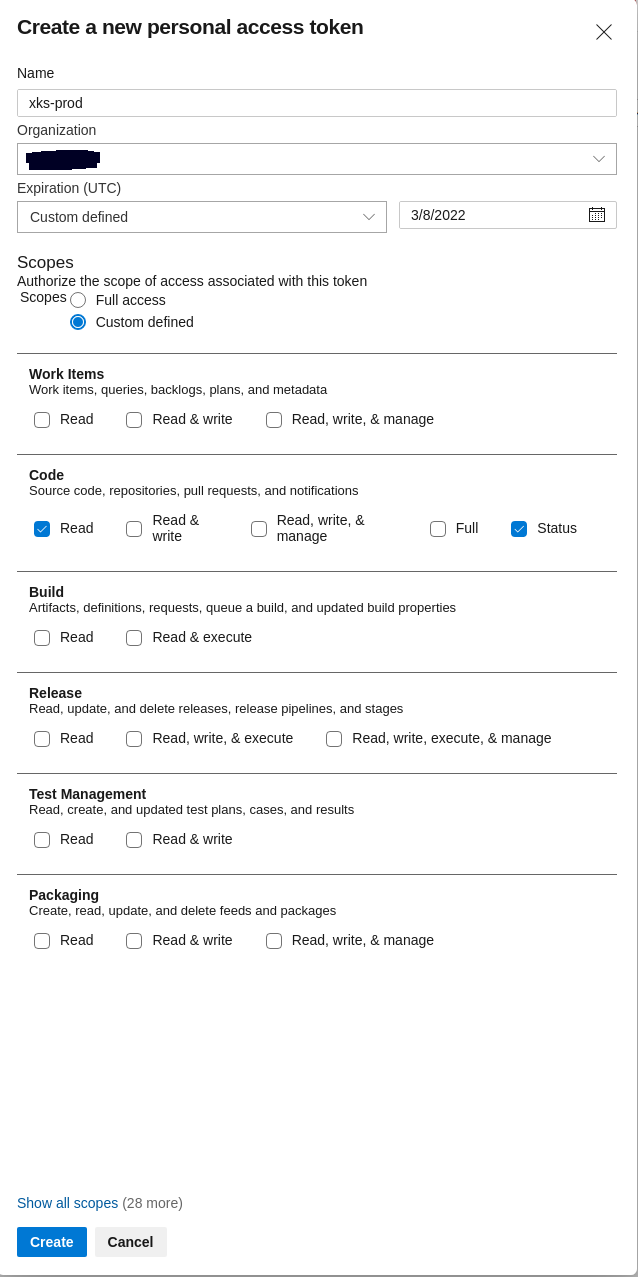
Copy the generated key, we will need it for the next step.
Add PAT to Azure Key Vaults
To make it possible for terraform to reach the PAT in a easy and secure way we have chosen to store the PAT in Azure Key Vaults which you need to add manually.
Azure CLI
You can add the secret using the az CLI.
Call the secret azure-devops-pat and the value should be the token you created in Azure DevOps.
# List all key vaults
az keyvault list

# Create the secret
az keyvault secret set --vault-name kv-dev-we-core-1234 --name azure-devops-pat --value "SuperSecretToken123"
Azure portal
Or if you prefer use the UI.
In the Azure portal search for "Key vaults" and pick the core one that matches the unique_suffix that you have specified in global.tfvars, in our case 1234.
Key vaults -> core-1234 -> Secrets -> Generate/Import
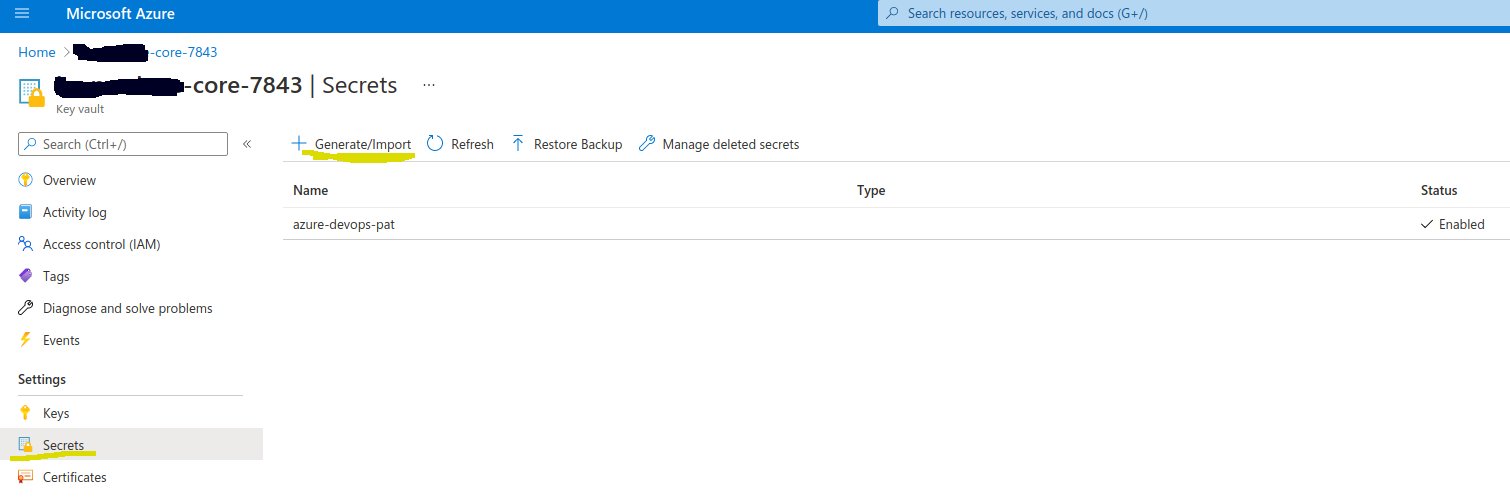
Call the secret azure-devops-pat and add the PAT key that you created in the previous step.
Admin and developer access
Hopefully you should now have one XKS cluster up and running, but currently no developer can actually reach the cluster.
In XKF we see clusters as cattle and at any time we can decide to recreate an XKS cluster. To be able to do this without our developers even knowing we use blue green clusters. TODO write a document on how blue green clusters works and link. We use GitOps together with DNS to be able to migrate applications without any impact to end-users assuming that our developers have written 12 step applications. To store state we utilize the cloud services available in the different clouds that XKF supports.
To make sure that our developers do not notice when we change our the cluster we have written a Kubernetes API Proxy called azad-kube-proxy.
Azure AD Kubernetes Proxy
AZAD as we also call it, is a deployment that runs inside XKS and sits in front of the Kubernetes API.
We also supply a krew/kubectl plugin to make it easy for our developers to use AZAD. For instructions on how to setup and configure this see.
AZAD Usage
Install krew: https://krew.sigs.k8s.io/docs/user-guide/setup/install/#windows
Install the azad-proxy plugin: kubectl krew install azad-proxy
Login with the Azure CLI (a valid session with azure cli is always required): az login
List all the available clusters: kubectl azad-proxy menu
You can also use the discover function:
kubectl azad-proxy discover
kubectl azad-proxy generate --cluster-name dev-cluster --proxy-url https://dev.example.com --resource https://dev.example.com
AAD groups
To make it possible for our developers and admins to actually login to the cluster we need to add them to a AAD group.
If you are a AAD guest user you need to add the AAD Role: Directory Reader to your user account. AZAD proxy parses the AAD and that is why the user needs Directory Reader.
No subscription
If you have not gotten any of the RG groups that XKF generates and perform az login you might see an error
saying that you do not have any subscriptions.
This is more likely if you are running XKF in AWS but also possible in Azure.
Do as the error suggest and use the --allow-no-subscription flag.
# The variable TENANT_ID = your tenant id
az login $TENANT_ID --allow-no-subscription
AZAD proxy should still work.
Developer groups
Depending on what configuration you did in global.tfvars this will differ but the group name should be something like bellow.
This group will give your developers contributor access in the namespaces where they have access.
<azure_ad_group_prefix>-rg-xks-<cluster-env>-aks-contributor
Example: az-rg-xks-dev-aks-contributor
Admin groups
To make it easy for you as a admin you should also use AZAD.
To give yourself cluster-admin access:
<azure_ad_group_prefix>-xks-<cluster-env>-clusteradmin
Example: aks-xks-dev-clusteradmin
Verify access
There is a flag in Kubernetes called --as, which enables you to see if a specific user got access to a specific resource.
Note this will not work if you are connecting to the cluster using AZAD-proxy due to it using the
--asflag to run the commands for you.
Since we are using OIDC we also need to provide the group id, you can find the group id in AAD. You can find the UUID of the group in AAD.
kubectl get pods --as-group=12345678-1234-1234-1234-00000000000 --as="fake"
If you already have a rolebinding where a existing UUID exist you can run the following command:
kubectl get pods --as-group=$(kubectl get rolebinding <rolebiding-name> -o jsonpath='{.subjects[0].name}') --as="fake"
Authorized IPs
To minimize the exposure of the XKS clusters we define a list of authorized IP:s that is approved to connect the Kubernetes cluster API.
We need to approve multiple infrastructure networks and user networks.
- If you are using the HUB module and you are running VMSS Azure Devops Agent you need to approve those IP:s as authorized.
- The AKS public IP
- Your developers' public IP
A recommendation is to add a comment with what IP you have added.
aks_authorized_ips = [ "8.8.8.8/32", # google dns "1.2.3.4/32", # developer x ip "2.3.4.5/30", # AKS0 dev ]